Table of Contents
Kool-Aid Hair Dye- Here’s How To Apply!
Kool-aid hair dye is for anyone who is not into permanent colors or looking to make a long-term commitment. You probably know there is no shortage of quick beauty hacks- like applying toothpaste to burns, using vaseline to cracked heels, and so much more that we cannot even begin to name.
Recently, kool-aid hair dye has emerged to help us color our hair by just dipping into the water, sounds crazy, right? This is what we call the new era of hair color.
Here’s what you need to do on kool-aid hair dye with simple steps on how to do it right.
Kool-aid hair dye

When you color your hair using kool-aid hair dye, the dye stains the hair shaft without leaving a permanent effect. It is an attractive option for anyone afraid to go permanently. For beginners, it can be messy. You are advised to dye using unsweetened kool-aid packets as the sweetened ones will make the dyeing process stickier. Try wearing a towel or an old tee shirt as it will become dirty, so you may not be able to wear it again.
The efficiency of kool-aid hair dye to absorb and work properly has everything to do with your hair’s porosity. Also, the base color plays a huge role in how your hair will appear after dying. Blonde hair color will receive colors vibrantly as they are where brunette will get the colors visible only when in light. To receive a more vibrant tone on darker hair, you must lighten your hair which stylists can only do at a salon.
If you have decided to apply kool-aid hair dye, here are all the materials you require to start with dying your hair:
- A shower cap or a plastic bag
- Container or bowl
- Hair dye brush
- Hair ties
- Disposable gloves
- Kool-aid hair dye packets
- Coldwater to wash the hair without letting the color fade.
Kool-aid hair dye- How to apply
There are several steps you need to follow to apply kool-aid hair dye:
Preparing the kool-aid hair dye

- Wear gloves that can be disposed of to avoid staining the hands. If you are not careful enough, you will have your hands match the hair color! To prevent such things from happening, slide onto a pair of either rubber gloves or disposable latex ones to keep the kool-aid dye from merging into your skin.
- If you stain part of the skin, do not panic, as there are a few means to get rid of the Kool-Aid hair dye stains.
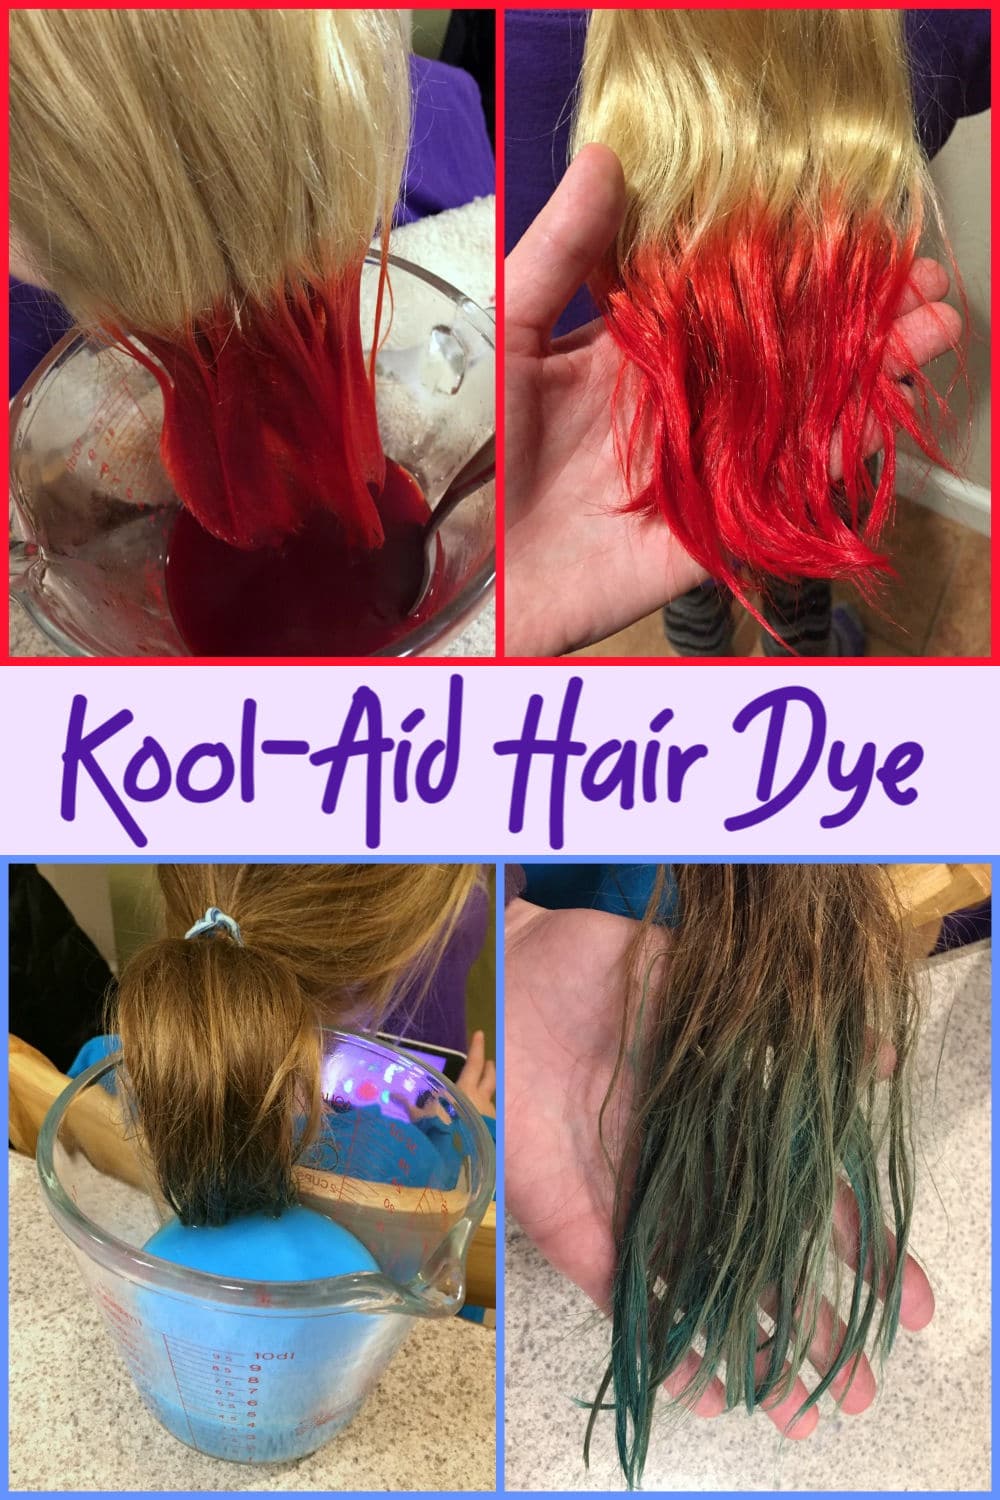
- Choose your fancied color from the Kool-Aid kit. Once you choose your favorite shade, use it or mix two shades to form a custom color of your choice. The grape will create a pretty violet purple. A tropical punch will make a brighter red, while a cherry will form a deeper red. Whereas in the more astonishing spectrum, blue raspberry finishes in blue and lime produce a bright green. You may create a mixed berry in a light blue.
- Know that the colors may come out differently on diverse hair types and primary base colors. For example, grape Kool-Aid will form a light pinkish violet shade when applied to blond blonde hair if you leave it on for just 30 minutes. But, the grape Kool-Aid hair dye shade will come out to be a deep reddish-purple when applied to dark brown hair after an hour.
- If you possess brown hair shade, vibrant reds typically come out to be the best. You may also attempt a deep purple hue and dark blue color! You will not be able to receive a lighter color than the natural shade of your hair without first opting for bleach for your hair, though.
- Vacant one or more sugar-free Kool-Aid packets as per your length into a small container. If you hold very long hair or wish to obtain a heavily saturated shade, using two or more packages is fine. The unsweetened variant is much less likely to be sticky than the sweetened artificial kind, allowing you to implement the dye fairly and smoothly.
- If you are unsure how your hair will react to the dye, begin with only one packet. You may then follow up with added dye session with the help of a few more packages to form the color of your preference.
- Suppose you are combining colors, first blend two packages. For example, attempt on black cherry combined with strawberry for a lively red shade or grape and strawberry for red-violet shade. You can also attempt blue raspberry with lemon-lime to form a turquoise hue.
- Mix in hot water to liquefy the powder. Begin by draining 1 to 2 US tbsp, 15 to 30 mL of warm water, to the bowl. Stir together the powder and water mixture, constantly stirring as needed with a spoon until your powder completely dissolves.
- A great rule of thumb is to practice 1 US tbsp or 15 mL of water for each packet of Kool-Aid hair dye. Try not to combine too much water, or else your mixture will become highly runny to apply to your hair.
- Join a hair conditioner in that mixture, too, to create a creamy consistency. Once the Kool-Aid hair dye is thoroughly dissolved, press a dollop of any hair conditioner into the container and blend it in. Start using 59 ml of conditioner and modify the measurements till you receive creamy paste. The smooth consistency of the dye paste will form the dye so that it becomes easier to manage and apply to your hair. Additionally, the conditioner will assist the stain spread throughout your hair.
- Make sure to cover your shoulders and place using an old towel. This dye can also paint your clothes, so have yourself protected using an old towel or any t-shirt that you do not mind becoming stained. Consider covering a large garbage sack throughout your shoulders and having it in place to keep any dampness from getting within. Also, protect the workspace using another set of towels or garbage bags in case dye drops onto the chair, the floor, or the table.
2. Dying all your hair

If you want to color all your hair, you should first divide them into 3 to 6 fragments and then attempt the color. Here’s how to proceed with kool-aid hair dye:
- Begin with washed, dry hair and apply clips or hair ties to your hair to pull back some hair parts. For uniform coverage, section your hair into various smaller segments to which you will implement the kool-aid hair dye.
- Attempt to divide the hair into vertical sections into right and left branches, and then separate each area into three horizontal segments: top, middle, and bottom.
- Alternatively, section your hair into the right, center, and left sections and operate your way from side to side.
- Or, begin displaying your hair at the neck and gathering the rest of your hair up at the crown. Pull out tiny segments as you struggle your way, starting from the nape to the peak.
Dye the Kool-Aid hair dye pastes to each segment of your hair, starting from the roots to hair tips:
- Either utilize gloved hands or use a hair dye brush to implement the dye paste to the hair. Begin with 1 section and paint the dye into the roots. Then even the shade down to hair strands, all the way reaching the tips, until the front section is fully coated.
- Tie behind each dyed segment and continue until all pieces are equally coated.
- All hair should be saturated using the dye, or the powder will wash out without dyeing your hair.
- If you are using kool-aid hair dye on your hair, you may wish to obtain the help of a family member or a friend. It will be hard to coat your hair at the back of the head uniformly.
Cover the hair in saran wrap:
- Tighten the hair at the crown using a few hair clips. Blow a few extended segments of saran wrap throughout your hair to retain it in place, such that it remains off of your face or shoulders. Alternatively, attempt using a plastic grocery sack or a re-sealable food accommodation bag. The plastic is used to help trap in any moisture and limit the dye from staining and spreading to other parts.
- Adjust the plastic wrap using tape for extra grip.
- This step is beneficial if you intend to leave the kool-aid hair dye on your hair for some hours.
Wait for as less as 15 minutes and as much as 5 hours for the aspired saturation in your hair-
If you own very light and fine hair and want a detailed tint in the hair, leave the hair dye on for only 15 or 30 minutes. But if your hair is darker or thicker, or if you wish to have a deeply saturated hair color, wait for a few hours before discarding the dye. If you have used more packets of Kool-Aid hair dye, it’s OK to leave your stain on for a quicker amount of time.
Wash the Kool-Aid dye paste out of the hair using cold running water.
- You can remove the saran wrap and switch on cool running water in a sink or shower. Clean your hair, beginning from the roots to the hair tips, beneath water till dye paste is removed from the hair. Keep on rinsing your hair until the water runs cleared(or just a light tint remains).
- It might take anywhere between 10 and 20 minutes to make the water run clear.
- Warm or hot water might quickly wash out any pigment from the recently-dyed hair strands, so avoid using it.
- Do not apply shampoo when you wash out the dye. Using shampoo can wash out and neutralize some of the shades.
Blow-dry or air-dry your freshly dyed hair to see the final results.
- Eliminate all the moisture from the hair, either using a hairdryer or by allowing it to dry naturally. Once the hair strands are thoroughly dry, you will be able to see the ultimate results of your -Aid hair dye! Have fun rocking and styling your new hairdo.
- To allow this temporary color to last as long as desirable, rinse your hair using cold water instead of hot water.
- It is OK to use warm water and heat styling tools, but bear in mind that the heat will make your hair dye disappear faster.
- You might need to test the dyeing process several times to obtain the right balance for the hair color. Just memorize that if you have deeper color hair, the results will be extra subtle.
3. Adding streaks of color

Lay a piece of saran wrap or aluminum foil behind 1 section of hair:
- When you are all set to begin dyeing your dry and clean hair, lift a tiny segment of hair and place a rectangular area of saran wrap or aluminum foil behind it. Put this wrap or foil directly at the root of the hair strands and use your hand to hold it from backward.
- First, think about how many strips or streaks you wish to add to the hair, and cut out one portion of saran wrap or foil for all stripes before you begin.
- If you are planning to get, narrow highlights attempt picking up and applying the dye to a few thin strands on the identical piece of saran wrap or aluminum foil.
Use any highlighting brush to dye 1-inch sections of the hair using Kool-Aid hair dye.

- Please pick up a bit of the pre-blended Kool-Aid hair dye paste using the brush and implement it straight to the hair. Clean it on, operating from the roots and reaching the tips until the entire section is spread.
- Maintain the strands from behind using your hand that is underneath the part of foil or saran wrap.
Wrap the piece of saran wrap or aluminum foil surrounding the dye-coated hair strand:
- To avoid the kool-aid hair dye from capturing onto other sections of your hair, envelop the saran wrap tightly throughout each colored strand.
- If your hair is wider than the section of saran wrap or foil, envelop the tips of the hair into a small bundle adjacent to your roots ere wrap up the foil.
Adjust each wrapped segment with a hairpin or using a hair tie:
- After you have painted a strand of hair and enclosed it in saran wrap, flip the foil up so it remains off the below layers of your hair. Slide a hairpin onto the bottom or middle of the tiny packet of hair to settle it at the crown.
- Try practicing a hair tie to form little bundles out of all hair sections if you practice saran wrap.
keep on painting the kool-aid hair dye onto tiny sections of the hair till you have the needed streaks:
- The most indulgent way to attach streaks is to begin at the crown and pin back all the foil-wrapped sections as you operate down your head. Once you have finished as many stripes as you wished to have, double-check that all the covered segments are secure.
- If you have plenty of streaks, try wrapping your hair with the help of a plastic bag or using a few long sections of saran wrap to secure them in place while you are waiting for the color to come out as vibrant and beautiful as you thought.
Let the kool-aid hair dye stay on your hair for at least 15 minutes to as much as 5 hours-
Based on natural hair color, the density of hair, and the depth of the color you wish to accomplish, allow the dye to stay on for as much as you want.
- If you wish to obtain a saturated shade, allow the dye to stay on for 5 hours.
- If you own light-colored hair and want a more delicate touch, do not allow the dye to sit on for longer than an hour.
Rinse the Kool-aid hair dye out of your hair under cold running water
- When you are ready to wash out the paint off your coat, unwrap all the strands using gloved hands and drop the sections of foil or saran wrap. Then using cool running water, you can rinse out the hair strands till the water runs completely clear or has a slight tint of color.

