How To Clear Clipboard- 4 Different Ways To Do It!
If you have enabled clipboard history in your windows 10, you must soon learn how to Clear Clipboard or disable it. If you are looking for ways to clear clipboard in your windows 10 or windows 7 computer, here’s what you need to follow.
copy and paste are two of the common and frequently utilized features in Windows 10 or any other windows. It is highly beneficial as well as time-saving for everyone to use these keyboard shortcuts of Ctrl+C for copying the contents from one place with texts on their clipboard and using Ctrl+V for pasting them. Have you ever tried clearing the clipboard? If you haven’t done it yet, there must be numerous copied contents present on the clipboard. However, for secrecy or security purposes, at times you might want to delete your clipboard history or simply clear a few items from it. Let’s see how to do that using a few options.
What is stored in the clipboard history?
To learn how to Clear Clipboard, you might be curious to know what is stored inside it. Basically, Clipboard history was at first launched along with Windows 10’s October Update in the year 2018, it stores a list of the 25 most recent items that anyone has copied to their Clipboards.
All these recent items may incorporate text, HTML, along with images less than 4 MB in size. Unless an item is bound or pinned to your Clipboard, the Clipboard history list gets deleted every time you start the device again.
Here’s how to clear clipboard using different ways:
1. How to clear Clipboard Through “Windows+V” Option
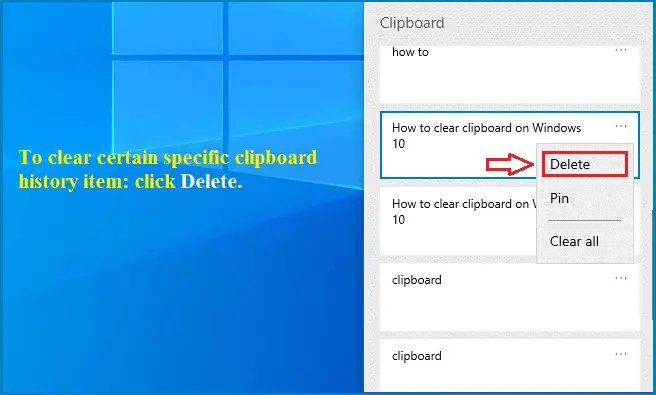
- If Clipboard history is allowed within the settings of the computer, you have to press Windows+V as it will draw up a small window that has lists of all the recent items anyone has copied to their Clipboard0.
- To delete specific items from your Clipboard history, call up this list by clicking Windows+V and then choose the three dots option or ellipses alongside the item you would want to remove.
- By doing this, a small menu is likely to appear. Now, click the “Delete” option and by doing this the item will be discarded from the list.
- Now, if you wish to remove all the things and not specific texts you can do that as well. To remove the entire Clipboard history, click on any set of these three dots above the individual history texts in the list. After that is done, a menu seems to pop up. In the menu, select the “Clear All” option.
- Any leftover items in this list of clipboard history that remain after you have selected “Clear All” are generally pinned in place. If you want to exclude any of these pinned items, again click on the ellipses present beside it and choose the option “Unpin.” Then you will be able to either delete it or you may try the “Clear All” option from these ellipses menu once again.
- If you are using a version of Windows 10 that is built before 1999, then all these steps are the same, but the interface tends to change slightly.
- When it is enabled, if you push Windows+V buttons, you will notice a small pop-up window containing the list of the recent items copied in your clipboards.
- To eliminate specific items from the Clipboard history, first open the list using Windows+V, and then choose the small “X” option beside the item you want to delete on the list. You already know what “X” means on your computer or laptop.
Note down that when you already have Clipboard history enabled, all the new items will proceed to arrive in your Clipboard history list anytime you try to copy something to your Clipboard. If you wish to limit Windows from saving the Clipboard history, you would want to disable this feature in your Windows Settings.
2. How To Clear Clipboard Using Command Prompt
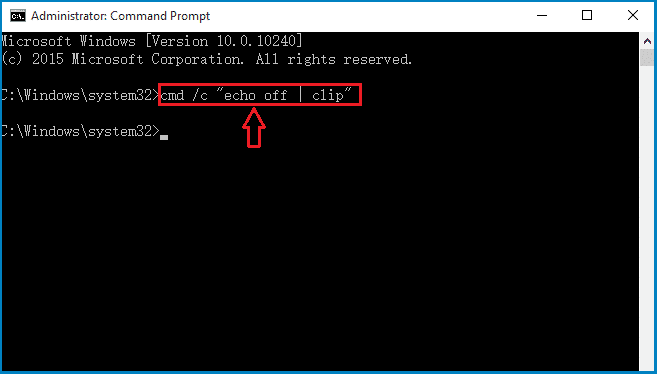
You may also find your answer for how to Clear Clipboard history on your Windows 10 by running the command using Command Prompt. Here’s what to do in detail:
- Open the Command Prompt
- Enter these- cmd /c “echo off | clip” to the Command Prompt and then push the “Enter” key to run it.
- Close the Command Prompt once you have finished.
3. How To Clear Clipboard By Creating A Shortcut
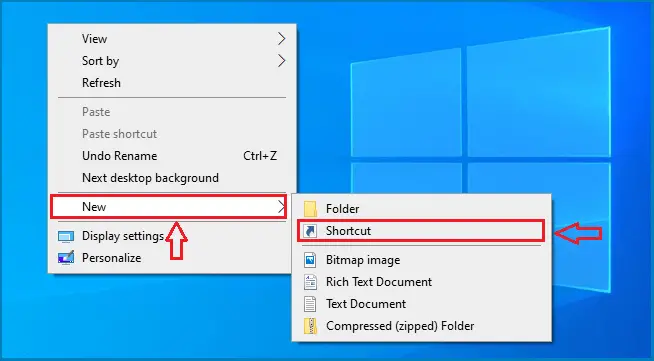
You may also create a shortcut to allow Windows 10 to empty the clipboard. Then any time for the next few days when you require to immediately clear your clipboard, you may simply run this shortcut.
Here are the steps you have to follow to attain this:
- First of all, Right-click on any space on your desktop and click on the New option, you will find many options further, choose Shortcut.
- Enter this command- cmd /c echo.|clip in the space that reads “Type the location of the item” field and then choose the “Next” option to proceed.
- Type some name for the shortcut created for example- “clear clipboard” and then choose the option- “Finish”.
After following all these steps you will see that this shortcut will be on your desktop. Next time when you want to unload or clear your clipboard, you can simply double click on this shortcut to achieve this.
These methods will work totally fine for your desktop, but if they don’t, here’s another method you can hop on to.
4. How To Clear Clipboard Through Settings
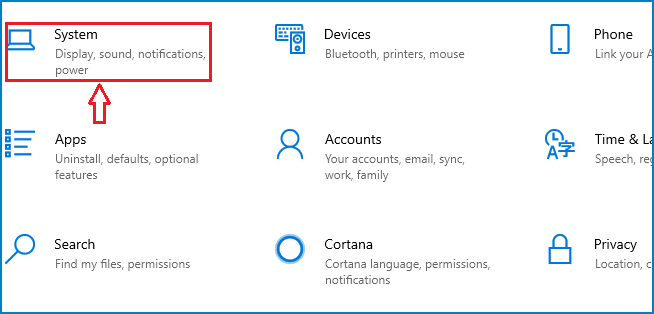
The most immediate, primary, and simplest way to empty your Windows 10 clipboard is by trying to use the Clipboard tab directly from your computer Settings. You may prefer to clear all your clipboard history including or excluding all the items you have pinned. Follow the steps given below to clear the clipboard in your Windows 10:
- Click on the Windows icon given on the bottom left edge of the desktop or interface, now select Settings options and open it, and then go to System from this list.
- Click on Clipboard given on your left pane.
- And further, on the right pane, you may also select the option to clear all the clipboard history either by excluding all the pinned items or by adding pinned items to the list too.
- To empty all the clipboard history except for the pinned items, select the Clear button that is located below the division of Clearing clipboard data.
These were 4 highly useful ways for How To Clear Clipboard whenever needed. Choose the one that you find easy and get going!

